
VST Plugins (96)
Electronic Music Industry Continues Massive Global Growth in 2026
Written by Sounds Space
Triaz Player Free Plugin Review 2026 – 4000 Drum Samples & Presets
Written by Sounds Space
Triaz Player: The Ultimate FREE Drum Plugin Every Producer Needs in 2026
If you're a music producer looking to elevate your drum game without spending a penny, Triaz Player might just be the most exciting release of the year. Packed with 4,000 award-winning drum samples, 200 expertly crafted presets, and powerful beat-making tools, this free plugin brings professional-grade drum production directly into your DAW.
In this in-depth guide, we’ll explore everything you need to know about Triaz Player, including its features, workflow, sound quality, and why it’s quickly becoming a must-have plugin for producers in 2026.
What Is Triaz Player?
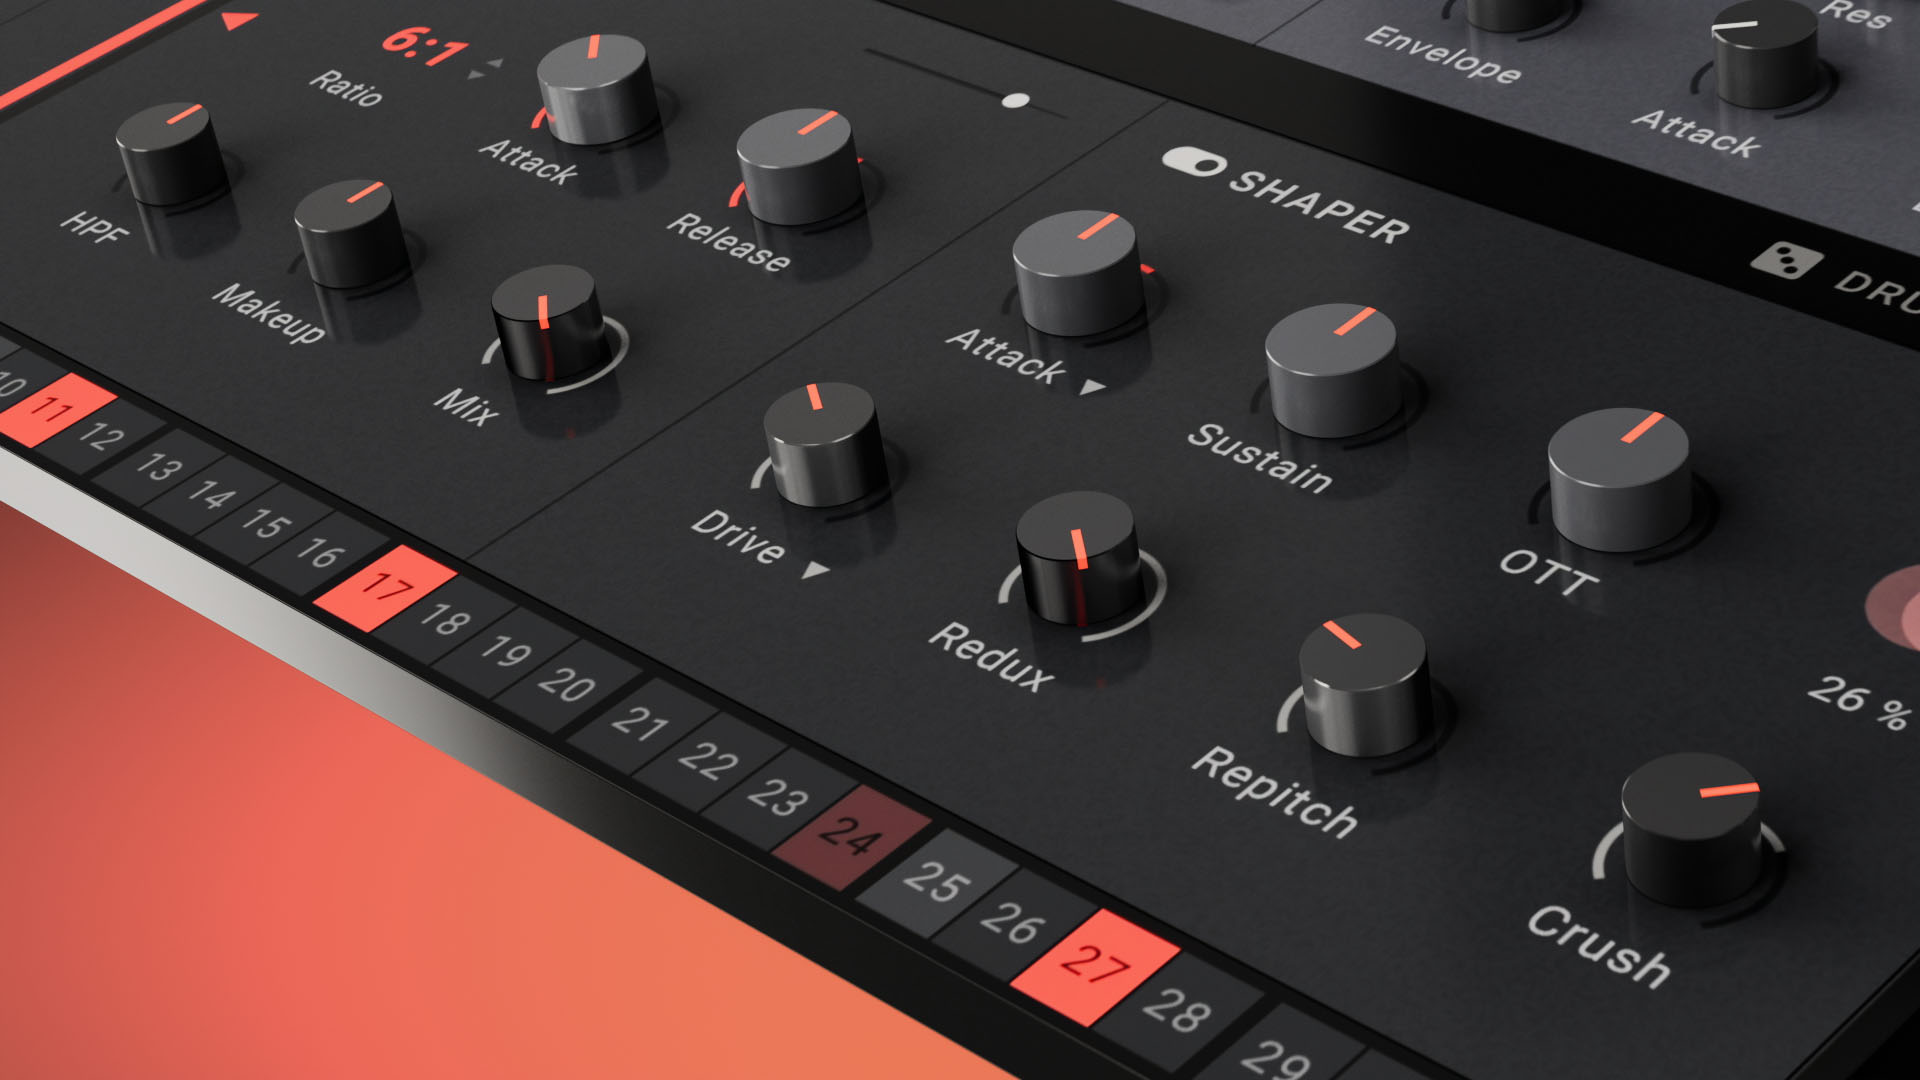
Triaz Player is a 100% free drum plugin and sample player designed for modern music producers. Built on the foundation of the premium Triaz drum production system, it offers a streamlined yet powerful experience for creating, editing, and exporting drum patterns.
Available as a VST3, AU, and AAX plugin, Triaz Player works seamlessly across macOS and Windows, making it accessible for virtually every producer regardless of their setup.
But don’t let the “free” label fool you—this is not a stripped-down demo. It’s a fully functional creative tool designed to compete with top-tier drum plugins.
Key Features of Triaz Player
1. 4,000 Award-Winning Drum Samples
At the heart of Triaz Player is a massive library of 4,000 high-quality drum samples. These aren’t just random sounds—they’re professionally designed, mixed, and ready to use.
You’ll find:
- Punchy kicks
- Crisp snares
- Sharp hi-hats
- Percussion loops
- Textures and FX
These samples are versatile enough to cover genres like:
- Tech House
- EDM
- Hip-Hop
- Trap
- Pop
- Drum & Bass
For producers working on projects like your Tech House releases or Diverse Beats platform, this level of quality can instantly elevate your sound.
2. 200 Inspiring Presets
Triaz Player includes 200 presets designed to spark creativity and speed up your workflow.
Each preset offers:
- Pre-arranged drum kits
- Genre-specific grooves
- Balanced mixing and processing
- Ready-to-use patterns
This is perfect if:
- You’re working under tight deadlines
- You want instant inspiration
- You’re building ideas quickly for clients or content
3. Powerful Drum Engine
Even though it’s free, Triaz Player uses the same advanced engine as the full Triaz plugin.
This means you can:
- Layer multiple drum sounds
- Shape each sound individually
- Apply effects and processing
- Build complex, professional drum patterns
The interface is designed to be intuitive, so you can focus on creativity instead of technical setup.
4. Full Expansion Compatibility
One of the most powerful features of Triaz Player is its ability to import Triaz Expansions.
This means:
- You can expand your sound library infinitely
- Access genre-specific packs
- Stay up-to-date with new sounds
For producers building a long-term sound identity, this is a huge advantage.
5. Advanced Editing & Sound Design
Triaz Player isn’t just a sample player—it’s a full drum design environment.
You can:
- Tweak individual drum sounds
- Adjust pitch, envelope, and dynamics
- Apply effects like EQ, compression, saturation
- Shape your drums to fit your mix perfectly
This level of control is usually reserved for paid plugins, making Triaz Player stand out in the free plugin market.
6. Drag-and-Drop Export (Game-Changer Feature)
One of the most impressive features is its drag-and-drop export system.
You can export:
- Full drum mixes
- Individual stems
- One-shot samples
- MIDI patterns
Directly into your DAW.
This gives you unmatched flexibility when arranging, mixing, or collaborating.
For example:
- Drag MIDI into Ableton to swap sounds
- Export stems for mixing in Logic Pro
- Use one-shots in your sampler
This feature alone can dramatically speed up your workflow.
Why Triaz Player Stands Out in 2026
The plugin market in 2026 is more competitive than ever, but Triaz Player stands out for several key reasons.
Completely Free – No Catch
Unlike many “free” plugins that are limited demos, Triaz Player is:
- Fully functional
- No time restrictions
- No hidden paywalls for core features
This makes it ideal for:
- Beginners
- Independent artists
- Producers on a budget
Professional Sound Quality
The included samples are mix-ready, meaning:
- Less time spent on processing
- Better results instantly
- Cleaner, punchier drums
For platforms like your Diverse Beats ecosystem, this can help artists achieve professional results faster.
Perfect for Modern Producers
Triaz Player is built for today’s workflow:
- Fast idea generation
- Drag-and-drop simplicity
- DAW integration
- Expansion-ready ecosystem
This aligns perfectly with modern content-driven production, especially if you're creating:
- TikTok-ready tracks
- YouTube content
- Fast-release music strategies
Workflow: How to Use Triaz Player
Let’s break down a simple workflow using Triaz Player.
Step 1: Load a Preset
Start by selecting one of the 200 presets to get a quick groove going.
Step 2: Customize Your Kit
Swap out sounds or tweak:
- Kick punch
- Snare snap
- Hi-hat groove
Step 3: Build Your Pattern
Use the internal sequencer or import MIDI.
Step 4: Apply Effects
Shape your sound using built-in processing tools.
Step 5: Export Your Beat
Drag:
- MIDI into your DAW
- Stems for mixing
- Full loops for quick arrangement
This workflow is incredibly efficient and perfect for both beginners and professionals.
Triaz Player vs Paid Drum Plugins
How does Triaz Player compare to premium drum plugins?
Pros:
- 100% free
- High-quality sounds
- Professional workflow tools
- Expansion support
- Drag-and-drop export
Cons:
- Limited compared to full Triaz version
- Expansion packs may be paid
- Slightly less deep than flagship drum engines
Still, for a free plugin, it competes with tools that cost $100+.
Best Use Cases for Triaz Player
1. Tech House Production
Perfect for creating punchy, club-ready drums—ideal for your Subaholic-style releases.
2. Content Creation
Quickly generate beats for:
- YouTube videos
- Social media
- Ads
3. Beginner Producers
An excellent starting point without overwhelming complexity.
4. Professional Workflow Enhancement
Even experienced producers can use it for:
- Quick sketching
- Layering drums
- Idea generation
System Requirements & Compatibility
Triaz Player is available as:
- VST3
- AU
- AAX
Compatible with:
- Ableton Live
- FL Studio
- Logic Pro
- Pro Tools
- Cubase
Operating Systems:
- macOS
- Windows
This wide compatibility ensures it fits into almost any production setup.
Tips to Get the Most Out of Triaz Player
Layer Your Sounds
Combine multiple kicks or snares for a fuller sound.
Use MIDI Export
Drag MIDI into your DAW to customize patterns further.
Experiment with Effects
Don’t settle for presets—tweak them to create your signature sound.
Organize Your Workflow
Use Triaz Player for sketching, then finalize in your DAW.
Final Verdict: Is Triaz Player Worth It?
Absolutely.
Triaz Player is one of the best free plugins of 2026, offering:
- Professional-quality drum sounds
- Powerful editing tools
- Seamless workflow integration
- Expansion flexibility
Whether you're a beginner or a seasoned producer, this plugin can significantly improve your drum production without costing a cent.
Conclusion
In a world where high-quality plugins often come with high price tags, Triaz Player breaks the mold. It delivers a premium drum production experience for free, making it accessible to everyone.
For producers building platforms, releasing music, or creating content at scale—like what you're doing with Diverse Beats and Solutions Media—tools like this are invaluable.
If you haven’t tried it yet, now is the perfect time to download Triaz Player and take your beats to the next level.
Top 40 Free VST Plugins to Download in April 2026 (Complete Producer Guide)
Written by Sounds Space
Top 40 FREE VST Plugins to Download in April 2026 (Ultimate Producer Guide)
Free VST plugins have reached an incredible level in 2026. Whether you're producing Tech House, creating cinematic music, or building a home studio from scratch, you can now get professional-level sound without spending a single dollar.
According to multiple 2026 plugin roundups and music-production blogs, new free releases appear every month, including synths, mix tools, drum instruments, and creative FX that rival paid plugins.
Even major developers are giving away premium plugins temporarily—one example in March 2026 was a high-end reverb plugin that normally costs $79 but was offered for free for a limited time.
In this guide, you’ll find the Top 40 FREE VST plugins to download in April 2026, divided into clear categories so you can build a full professional setup quickly.
Why Free VST Plugins Are Better Than Ever in 2026
There was a time when free plugins were basic and low-quality. That’s no longer true.
Modern free plugins now include:
- Wavetable synthesizers with visual interfaces
- Dynamic EQs that rival paid mastering tools
- Professional drum instruments
- Cinematic sound libraries
- AI-based sound-design plugins
- Creative effects that simply didn’t exist five years ago
In fact, some updated 2026 lists claim there are now hundreds of genuinely useful free plugins, especially for beginners building their first studio.
So instead of wasting time installing random tools, here are the 40 best ones that actually matter in April 2026.
Category 1 – Best Free Synth VST Plugins (2026)
Synths are still the heart of modern music production, especially for Tech House, EDM, trap, and cinematic music.
1. Vital
Vital is still the king of free synthesizers in 2026. It’s a wavetable synth that sounds as powerful as premium synths and comes with a clean visual interface.
Why it’s still essential:
- Professional sound engine
- Real-time waveform visualization
- Great for basslines and leads
- Perfect for modern electronic music
Many 2026 plugin roundups still rank Vital as the best free synth available today.
2. Zebralette
This lightweight synth is perfect for cinematic sounds, pads, and ambient textures.
Best for:
- Film music
- Atmospheric pads
- Deep sound design
3. Pendulate
If you love experimental electronic sounds, Pendulate is still one of the most unique free synth plugins.
Great for:
- Techno
- Dark ambient
- Sound design
4. Surrealistic MG-1 Plus
A vintage-style synth with analog character that works beautifully in house and retro electronic music.
5. TAL-U-NO-62
Still one of the best free analog-style synth plugins ever created.
Perfect for:
- Tech House chords
- Deep house bass
- 80s synthwave sounds
6. Dexed
If you want classic FM sounds, Dexed is still unbeatable.
Best for:
- Retro house
- Classic dance music
- FM basslines
7. Spitfire LABS
Spitfire LABS continues to release new free instruments every year, and in 2026, it’s still one of the most inspiring plugins for melody creation.
8. Ample Bass P Lite II
A realistic bass guitar plugin that works perfectly in pop, rock, and EDM productions.
Still listed in 2026 as one of the best free instrument plugins available.
Category 2 – Best Free Drum VST Plugins (2026)
Every producer needs solid drum tools, especially if you’re producing house or techno.
According to updated drum plugin lists, free drum VSTs are stronger than ever in 2026.
9. Steven Slate Drums Free
Professional-quality acoustic drums are completely free.
10. Drum Player by 99Sounds
A simple but powerful drum rompler plugin that’s perfect for quick beat creation.
11. MT Power Drum Kit 2
Still one of the most realistic free drum VST plugins.
12. Sitala
Perfect for modern electronic music and fast beat creation.
13. Drum Pro
If you want quick drum ideas without complex settings, this is a great tool.
14. SampleScience Free Drum Instruments
SampleScience released dozens of free instruments in recent updates, including drum plugins.
15. DrumMic’a Free Edition
Professional drum recordings that sound great in any genre.
Category 3 – Best Free Mixing VST Plugins (2026)
Mixing plugins are where modern free tools really shine.
16. TDR Nova
Still one of the most powerful free plugins ever made.
Why it stands out:
- Dynamic EQ
- Multiband compression
- Mastering-level quality
Still recommended in 2026 plugin lists as a must-have mixing tool.
17. Ozone Imager 2
Perfect for widening your mix without destroying mono compatibility.
18. Blue Cat Freeware Pack
A complete set of mixing tools, including EQ, chorus, flanger, and more.
19. Kilohearts Essentials
A full bundle of mixing tools used by many professional producers.
20. Youlean Loudness Meter
Still the best free loudness meter available.
21. TDR Kotelnikov
Professional mastering compressor completely free.
22. Melda MFreeFX Bundle
One of the biggest free plugin collections in the world.
Category 4 – Best Free Reverb & Delay Plugins (2026)
Reverb and delay plugins are essential for creating space in your music.
23. Valhalla Supermassive
One of the best creative reverb plugins ever released—and still completely free.
24. Sparkverb (Free Limited Giveaway)
A premium plugin that became free for a limited time in 2026, proving that even high-end plugins are now being given away.
25. TAL-Reverb 4
Simple, clean, and perfect for electronic music.
26. OrilRiver
One of the most realistic free reverbs available.
27. Dragonfly Reverb
Great for cinematic music and orchestral production.
28. Valhalla Space Modulator
An excellent creative delay and modulation tool.
Category 5 – Best Free Vocal VST Plugins (2026)
If you’re recording vocals or producing artists (like you’re doing with The Dream X), these plugins are essential.
29. GSnap
Still one of the easiest free pitch-correction tools.
30. MAutoPitch
A simple but powerful free autotune-style plugin.
31. TAL-Chorus LX
Perfect for vocal width and depth.
32. Klanghelm IVGI
Amazing free saturation plugin for vocals.
Category 6 – Best Free Creative FX Plugins (2026)
This category is where things get exciting.
In March 2026, an entire collection of experimental plugins was released for free after the developer closed down—something that shows how fast the free plugin world is evolving.
33. Amalgame (Inear Display)
One of the most powerful free multi-FX plugins right now.
34. Ephemere
A creative percussion synth plugin that’s perfect for experimental electronic music.
35. Litote
A beautiful ambient FX plugin, great for cinematic music.
36. Tape Fiasco
A free tape-emulation plugin that’s getting a lot of attention in 2026 plugin news.
37. Temperance Lite Reverb
A new-generation creative reverb plugin was released recently.
38. Spirals Delay
One of the most creative free delay plugins released in recent months.
Category 7 – Best Free Utility VST Plugins (2026)
These plugins don’t make sound—but they improve your workflow massively.
39. SPAN
A professional spectrum analyzer is used by many mixing engineers.
40. Hornet AutoGain
Automatically matches plugin volume levels so you can mix faster.
How to Build a Full Professional Studio Using Only Free Plugins (2026)
If you download the plugins in this guide, you can build a full production setup:
Sound Creation
- Vital
- LABS
- Zebralette
Drums
- Steven Slate Drums Free
- Drum Player
- Sitala
Mixing
- TDR Nova
- Ozone Imager
- Kotelnikov
Effects
- Valhalla Supermassive
- Dragonfly Reverb
- TAL-Chorus LX
Creative FX
- Amalgame
- Tape Fiasco
- Spirals Delay
This means you can produce professional-quality music without spending anything at all, something that would have been impossible even five years ago.
Final Thoughts – The Free Plugin Revolution Is Just Beginning
2026 is proving to be one of the biggest years ever for free VST plugins. New tools are being released constantly, older premium plugins are being given away for free, and even experimental developers are making their entire catalogs available at no cost.
If you're serious about music production in 2026, the 40 plugins in this list will give you everything you need:
- Synths
- Mixing tools
- Drums
- Vocal plugins
- Creative FX
- Professional mastering tools
Best VST Plugins 2026: The Latest Synths, Reverbs & Must-Have Plugins for Producers
Written by Sounds Space
These NEW VST Plugins Are Taking Over the Music Industry in 2026 (You Won’t Believe #1)
If you feel like music production is changing faster than ever, you’re not imagining it. Over the last 12 months alone, the plugin world has exploded with new paid VST synths, mixing tools, and creative effects that are completely reshaping how modern producers work.
From the long-awaited successor to one of the most iconic synths ever made to mind-bending reverb tools that can literally create sounds that don’t exist in real life, 2025–2026 has been one of the most exciting periods in music production history. Major sites such as MusicTech, MusicRadar, and Gearnews are even publishing weekly “new plugin releases” because so many new tools are coming out every month.
In this blog post, we’ll cover the latest paid VST plugins that producers are talking about right now, including new synths, new reverb plugins, and the newest mixing tools that are shaping the sound of modern music.
Why 2026 Is One of the Biggest Years Ever for VST Plugins
Before we jump into the list, it’s important to understand why so many new paid plugins are being released right now.
Music production is going through a massive shift. Instead of releasing simple plugins like EQs and compressors, developers are now creating hybrid tools that combine synthesis, AI processing, and advanced sound design features. Weekly plugin-release lists show that new virtual instruments, vocal processors, and creative effects are being launched almost every week.
On top of that, major publications have already described 2025 as one of the most exciting years ever for music production software, highlighting a huge number of new plugins across multiple categories.
The result? If you’re a producer in 2026, you have access to tools that were impossible just a few years ago.
The Most Hyped New Paid VST Synth Plugins Right Now
Let’s start with the category everyone cares about the most: new synth plugins.
1) Serum 2 – The Most Anticipated VST Synth of the Decade
If you’ve been producing music for a while, you already know how important Serum was. It became one of the most widely used wavetable synths in the world and completely changed the sound of EDM, house music, and modern pop.
That’s why the release of Serum 2 has been such a huge moment in the music industry. Even before the official release, music production websites were already reporting that a new version of Serum was coming, and the hype quickly spread across producer communities.
What makes this new version so powerful is that it’s no longer just a wavetable synth. Instead, it’s evolving into a hybrid sound-design powerhouse that combines multiple synthesis types in a single plugin.
Why producers are excited about Serum 2:
- More advanced oscillator types
- New sound-design workflow features
- Modern visual interface upgrades
- A completely new sound-design engine
Because of this, many producers are already calling it one of the most important VST releases of the decade.
2) The New Generation of Hybrid Synth Plugins
Serum 2 is not the only new synth making waves. The latest plugin roundups show that hybrid synths – especially those combining wavetable, granular, and spectral processing – are dominating the market right now.
Developers are moving away from traditional synth design and focusing on tools that allow producers to create completely unique sounds rather than just using presets.
What makes these new synth plugins different:
- More focus on sound design rather than traditional synthesis
- Faster workflow with drag-and-drop modulation
- Hybrid synthesis engines
- More cinematic and atmospheric sounds
If you produce electronic music, this new generation of synths is probably the biggest upgrade you can make to your setup in 2026.
The New Paid Reverb Plugins Everyone Is Talking About
Reverb plugins are usually not the most exciting tools – but that has completely changed in 2026.
3) SpaceBlender – The Reverb Plugin That Changed Everything
One of the biggest new paid plugins released recently is SpaceBlender, a reverb plugin that focuses on creating sounds that don’t even exist in real life.
Instead of trying to simulate real rooms, this plugin is designed to create entirely new soundscapes. It was first shown at the NAMM show and later introduced as one of the most innovative new effects plugins of the year.
Why producers are obsessed with it:
- It can create evolving ambient soundscapes
- It uses spectral processing instead of traditional reverb algorithms
- It’s perfect for cinematic music and atmospheric sound design
- It makes even simple sounds sound massive
Music production websites have already included it in “best plugins of the year” lists, which shows how big the impact has been.
4) The Rise of Creative Reverb Plugins
SpaceBlender is just one example of a much bigger trend. Instead of creating realistic reverb, developers are now building creative spatial effects that can completely transform a sound.
Weekly plugin-release pages show that new reverb tools are being released all the time, especially ones designed for modern electronic music and cinematic production.
Why this matters for producers:
- You can create unique sounds instead of using the same presets as everyone else
- Your tracks will sound more professional
- You can create huge atmospheres with very little effort
If you want your music to stand out in 2026, using modern reverb plugins is almost essential.
The New Mixing and Sound-Design Plugins That Are Changing Production
It’s not just synths and reverbs that are evolving. Mixing plugins are also getting smarter and more creative.
5) The New Generation of Smart Mixing Plugins
According to plugin-release roundups, many new paid plugins are now focused on smart processing and creative sound design rather than traditional mixing tools.
Instead of manually adjusting dozens of parameters, producers can now use plugins that automatically improve the sound while still giving full creative control.
Why are these new mixing plugins so popular?
- Faster workflow
- Better sound quality with less effort
- More creative possibilities
- Perfect for beginners and professionals
Because of this, many producers are now building entire mixes using only modern plugins instead of traditional ones.
Why These New Paid VST Plugins Are So Important for Producers
So why do these plugins matter so much? Why are producers so excited about them?
The answer is simple: they allow you to sound different from everyone else.
In the past, most producers used the same plugins. That’s why so many tracks sounded similar. But now, with new synth engines, new reverb technology, and new mixing tools, it’s easier than ever to create a unique sound.
Major music production websites have already said that the latest plugins released in 2025 introduced completely new ways to produce music, especially in electronic genres.
That’s why staying updated with the newest paid VST plugins is so important if you want to stay competitive in the music industry.
How These Plugins Are Changing the Sound of Modern Music
You can actually hear the difference in modern music.
New plugins are helping producers create:
- Bigger bass sounds
- Cleaner mixes
- More atmospheric tracks
- Unique sound-design textures
- More professional-sounding music overall
Because of this, the gap between amateur producers and professional producers is getting smaller. With the right plugins, almost anyone can create a professional-level track from their bedroom studio.
Should You Upgrade Your Plugins in 2026?
If you’re still using the same plugins you used three or four years ago, now might be the perfect time to upgrade.
The latest plugin roundups clearly show that the new generation of plugins is much more powerful than older tools.
Here’s when upgrading makes the most sense:
- If you want your music to sound more professional
- If you want a faster workflow
- If you want to improve your sound design
- If you want to stand out from other producers
Even upgrading just one or two plugins can make a huge difference.
The Future of Paid VST Plugins
If 2025–2026 is already this exciting, the future looks even more insane.
Plugin developers are now focusing on:
- AI-powered music production tools
- Hybrid synth engines
- Advanced sound-design plugins
- Faster and smarter mixing tools
Because of this, the next few years could completely change the way music is produced.
Final Thoughts – These New Paid VST Plugins Are Changing Everything
If you want to stay competitive as a producer in 2026, keeping up with the newest VST plugins is no longer optional – it’s essential.
The latest releases show that the music industry is moving toward faster workflows, more creative sound-design tools, and completely new ways of producing music. And the best part is that these tools are now available to anyone with a laptop and a DAW.
Whether you’re producing EDM, house music, pop, or cinematic music, the newest paid VST plugins can completely transform your sound.
And honestly, if the last 12 months are anything to go by, the next 12 months are going to be even bigger.
SOL Free Reverb Plugin by S1gns Of L1fe & Dawesome – Full Review and Features (2026)
Written by Sounds Space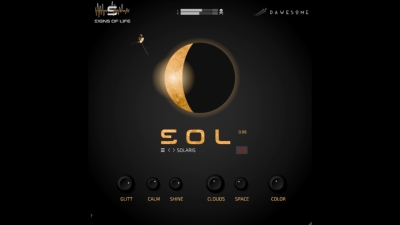
SOL – The Free Reverb Plugin by S1gns Of L1fe and Dawesome: A Game-Changer for Music Producers
The world of music production in 2026 is evolving faster than ever. From AI-driven tools to ultra-realistic virtual instruments, producers now have access to technology that was unimaginable just a few years ago. However, one thing has always remained essential: high-quality reverb. Whether you produce electronic music, cinematic soundtracks, hip-hop beats, or ambient soundscapes, reverb is the tool that gives your music depth, space, and emotion.
That is exactly where SOL Reverb Plugin comes in. Developed by ambient music artist S1gns Of L1fe in collaboration with the innovative plugin developer Dawesome, SOL is more than just another free reverb. It is a powerful, creative, and inspiring tool designed specifically for producers who want cinematic-quality space without paying premium prices.
In this in-depth SEO-optimized blog post, we will explore what SOL is, who created it, its key features, why it stands out from other free reverbs, and why every producer should add it to their plugin collection today.
What Is SOL Reverb Plugin?
SOL Reverb Plugin is a free reverb VST plugin created through a collaboration between S1gns Of L1fe and Dawesome. It is designed to deliver lush, atmospheric, and musical reverb tones that work perfectly in modern music production environments.
Unlike many free plugins that focus only on basic functionality, SOL aims to provide professional-level reverb quality with a simple but powerful interface. The plugin is especially appealing for:
- Ambient music producers
- Electronic music creators
- Cinematic composers
- Sound designers
- Vocal producers
- Beginners looking for a high-quality free reverb
SOL stands out because it combines artistic creativity with advanced audio processing technology.
Who Created SOL? Understanding the Collaboration
S1gns Of L1fe – The Creative Vision
S1gns Of L1fe is well known in the ambient and atmospheric music scene. His music focuses heavily on emotion, texture, and spatial depth, which naturally makes reverb one of the most important elements in his sound design process.
Instead of relying only on existing plugins, he collaborated with a professional developer to create a reverb tool that reflects how modern ambient producers actually work.
The result is a plugin that feels less technical and more creative. Instead of forcing producers to tweak complicated parameters, SOL focuses on creating inspiring sounds quickly.
Dawesome – The Technology Behind the Plugin
Dawesome is one of the most respected modern plugin developers. The company is known for creating visually stunning, creative audio tools that combine powerful sound engines with easy-to-use interfaces.
By combining the musical vision of S1gns Of L1fe with the technical expertise of Dawesome, SOL became a plugin that is both musically inspiring and technically advanced.
This collaboration is one of the main reasons why SOL feels more premium than most free plugins.
Why Reverb Is One of the Most Important Effects in Music Production
Before diving deeper into SOL, it’s important to understand why reverb is so essential.
Reverb is not just an effect. It is what gives your music space and realism. Without reverb, most tracks sound flat and lifeless.
Reverb is used to:
- Create depth in a mix
- Make vocals sound more emotional
- Add atmosphere to pads and synths
- Simulate real acoustic environments
- Create cinematic soundscapes
- Blend instruments together naturally
This is why producers often spend hundreds of dollars on premium reverb plugins. However, SOL proves that you can now get high-quality reverb without spending anything.
Key Features of the SOL Reverb Plugin
1. High-Quality Reverb Engine
SOL Reverb Plugin uses a powerful reverb engine that produces warm, smooth, and professional-sounding reverb tails.
Many free plugins sound metallic or harsh, especially when you increase the decay time. SOL, however, keeps the sound smooth even with very long reverbs. This makes it perfect for:
- Ambient music
- Chillout tracks
- Tech house pads
- Cinematic intros
- Atmospheric vocals
2. Designed for Creative Music Production
Unlike traditional reverbs that focus only on realism, SOL focuses on musical creativity.
That means the plugin is not just for making instruments sound like they are in a room. It is also perfect for creating:
- Dreamy soundscapes
- Emotional breakdown sections
- Atmospheric intros
- Long evolving pads
- Reverb-based sound design
This is one of the main reasons why producers love it.
3. Beautiful and Easy-to-Use Interface
One of the biggest strengths of Dawesome is interface design. And that is clearly visible in SOL Reverb Plugin.
The plugin is designed to be:
- Simple for beginners
- Fast for professionals
- Visually inspiring
- Easy to understand
- Creative rather than technical
Instead of spending hours tweaking complicated settings, you can quickly find the sound you want and stay focused on making music.
4. Perfect for Ambient and Electronic Music
Because the plugin was created by S1gns Of L1fe, it naturally shines in atmospheric music styles.
SOL works especially well for:
- Ambient music
- Tech house
- Melodic techno
- Deep house
- Cinematic music
- Chillout music
- Sound design
If you are producing emotional or atmospheric tracks, this plugin can instantly improve your sound.
Why SOL Is Better Than Many Other Free Reverb Plugins
There are thousands of free plugins available online. However, most of them fall into one of these categories:
- Very basic
- Poor sound quality
- Complicated interfaces
- Limited creativity
- Outdated technology
SOL Reverb Plugin is different because it feels like a premium plugin that just happens to be free.
Here are the main reasons why it stands out:
Professional Sound Quality
The reverb tails sound clean, smooth, and musical.
Modern Plugin Design
The interface looks modern and professional.
Built by Real Producers
It was created by someone who actually makes music every day.
Ideal for Modern Genres
It works perfectly for electronic music and atmospheric production.
How to Use SOL in Your Music Production Workflow
One of the best things about SOL Reverb Plugin is how easy it is to integrate into your workflow.
Here are some practical ways to use it:
1. Reverb for Vocals
SOL works beautifully on:
- Pop vocals
- Ambient vocals
- Deep house vocals
- Tech house vocals
- Emotional breakdown sections
It adds depth without making the vocal sound muddy.
2. Reverb for Synth Pads
If you produce electronic music, this is where the plugin really shines.
Use SOL to:
- Make pads wider
- Create emotional atmospheres
- Add cinematic depth
- Turn simple sounds into powerful textures
3. Reverb for Drum Effects
You can also use SOL creatively on drums:
- Reverb on snares
- Reverb on claps
- Atmospheric drum fills
- Cinematic percussion effects
This can completely transform the energy of your track.
Compatible with All Major DAWs
Another major advantage of SOL Reverb Plugin is that it works perfectly with all major DAWs.
You can use it in:
- Ableton Live
- FL Studio
- Logic Pro
- Cubase
- Studio One
This means no matter what type of producer you are, you can start using SOL immediately.
Why Free Plugins Like SOL Are Important in 2026
The music industry has changed dramatically. Today, anyone can produce professional-quality music from home. However, many beginners still struggle because premium plugins are expensive.
That is why tools like SOL Reverb Plugin are so important.
They allow:
- New producers to start without spending money
- Independent artists to improve their sound quality
- Content creators to produce better audio
- Sound designers to experiment freely
- Musicians to stay creative without financial pressure
In a world where creativity matters more than budget, free professional plugins are becoming more valuable than ever.
How SOL Helps You Sound More Professional
Many beginner producers think they need expensive plugins to sound professional. In reality, what matters most is how you use the tools you already have.
SOL helps you sound more professional because:
- It adds realistic space to your mix
- It makes your tracks sound deeper
- It creates emotional impact
- It improves vocal quality
- It makes instruments sound more natural
- It adds cinematic atmosphere
Even if you use only basic instruments, a high-quality reverb like SOL can instantly upgrade your sound.
Perfect for Modern Music Producers
If you produce modern genres like:
- Tech house
- Deep house
- Melodic techno
- Ambient music
- Electronic pop
- Cinematic soundtracks
Then SOL Reverb Plugin is definitely worth trying.
It is especially useful if you want your tracks to sound emotional, atmospheric, and professional.
Final Thoughts: Is SOL Reverb Plugin Worth Downloading?
The answer is simple: Yes. Absolutely.
SOL Reverb Plugin is one of the best free reverb plugins available today. The collaboration between S1gns Of L1fe and Dawesome has created a tool that feels modern, inspiring, and professional.
Whether you are a beginner producer or an experienced artist, this plugin can help you:
- Create deeper mixes
- Improve your sound quality
- Add emotion to your tracks
- Build cinematic atmospheres
- Produce professional-sounding music at zero cost
In 2026, where creativity and originality matter more than ever, tools like SOL prove that you don’t need expensive plugins to create amazing music. Sometimes, the best tools are the ones that are built with passion rather than profit.
Waves Diamond Bundle Is Now Available for Only $199 at Sounds Space! Save Over $2800 Today
Written by Sounds Space
Waves Diamond Bundle Now Available for Only $199 at Sounds Space
Music producers and audio engineers are always searching for high-quality plugins that can transform their mixes and take their productions to a professional level. If you’ve been looking for a complete mixing and mastering solution, this may be one of the biggest plugin deals of 2026.
The Waves Diamond Bundle is now available at Sounds Space for $199, saving producers more than $2800 off the original price.
This is not just another plugin sale. The Waves Diamond Bundle has been one of the most respected plugin collections in the music industry for years, and at this price, it becomes one of the most affordable professional bundles available today.
In this article, we’ll explore what makes the Waves Diamond Bundle so powerful, why this price drop is such a big opportunity for producers, and why this deal is attracting so much attention in the music production community.
What Is the Waves Diamond Bundle?
The Waves Diamond Bundle is a massive collection of professional audio plugins designed for mixing, mastering, production, and audio restoration. It includes more than 80 high-quality plugins covering everything a modern producer needs.
According to major music-production stores such as Sweetwater and Plugin Boutique, the bundle includes professional tools such as compressors, EQs, reverbs, delays, mastering processors, vocal tools, and audio restoration plugins.
The original retail price of the bundle was approximately $2,999, positioning it as a premium product aimed primarily at professional studios.
However, massive discounts have made the bundle much more accessible in recent years, and now it is available for just $199 at Sounds Space — a price that is difficult to ignore for both beginners and experienced producers.
Why This $199 Price Is Such a Big Deal
When a professional plugin bundle that originally cost nearly $3000 drops to under $200, it becomes one of the best value deals in the music production world. Even major retailers such as Sweetwater and Plugin Boutique currently list the bundle at heavily discounted prices well below the original price.
This means the Sounds Space price of $199 fits perfectly into the current trend of massive Waves discounts. But the real value comes from what you actually get inside the bundle.
Instead of buying individual plugins one by one, you get a full professional mixing environment in a single purchase. For independent artists, this is especially important because high-quality plugins can often be extremely expensive when purchased separately.
What You Get Inside the Waves Diamond Bundle
One of the reasons this bundle is so popular is the sheer number of plugins included. According to official product listings and plugin retailers, the bundle includes more than 80 plugins designed for every stage of music production.
Here are some of the main categories included in the bundle:
Professional Mixing Plugins
The bundle includes high-quality compressors, equalizers, and channel-strip plugins that can help producers achieve a professional mix. These tools are widely used for mixing vocals, drums, bass, and instruments.
Mastering Tools
The Waves Diamond Bundle also includes powerful mastering plugins such as multiband limiters, loudness meters, and stereo imaging tools. These are essential for producers who want their tracks to sound professional on streaming platforms.
Vocal Production Plugins
If you work with vocals, this bundle becomes even more valuable. It includes de-essers, vocal compressors, pitch-correction tools, and reverb effects that can dramatically improve vocal recordings.
Creative Effects and Sound Design Tools
In addition to mixing and mastering tools, the bundle also includes creative plugins such as delays, modulation effects, harmonic enhancers, and sound-design processors. These plugins can help producers create unique sounds and stand out from the competition.
Why Music Producers Still Trust Waves Plugins
Even though new plugin companies appear every year, Waves remains one of the most trusted names in the music production industry. Many professional producers and mixing engineers have used Waves plugins for decades because of their reliability and sound quality.
Major music-production stores continue to sell the bundle as a premium product designed for both professionals and serious beginners.
The biggest advantage of Waves plugins is that they are designed to work in almost every major DAW, including:
- FL Studio
- Ableton Live
- Logic Pro
- Cubase
- Pro Tools
This makes the Waves Diamond Bundle a safe investment for producers who want plugins that will work across different software platforms.
Perfect for Beginners and Professional Producers
One of the most interesting things about this deal is that it works for both beginners and professionals.
For Beginners
If you are just starting music production, buying individual plugins can quickly become expensive. This bundle solves that problem because it gives you everything you need in one purchase.
Instead of spending hundreds of dollars on individual plugins, you get a full professional setup for just $199.
For Professional Producers
Even experienced producers can benefit from this deal. Many professionals already use Waves plugins, and the Diamond Bundle allows them to upgrade their plugin collection without spending thousands of dollars.
This is one of the reasons why this bundle continues to be popular even years after its release.
Why This Deal Is Getting So Much Attention in 2026
The music production world is becoming more competitive every year. More people are producing music at home, and the demand for professional-quality sound is higher than ever.
Because of this, deals like the Waves Diamond Bundle at $199 attract huge attention. It gives independent artists access to tools that were once available only to professional studios.
Many producers are also focusing more on high-quality mixing and mastering in 2026, especially because streaming platforms now require higher sound quality to compete.
This makes the timing of this deal perfect for anyone who wants to improve their music production skills this year.
Is the Waves Diamond Bundle Worth It at $199?
The simple answer is yes, especially at this price.
When you consider that the bundle originally cost nearly $3000 and now costs only $199 at Sounds Space, the value becomes extremely clear. Even if you only use a small percentage of the plugins included, the bundle can still be worth the price.
For producers who want a professional sound without spending thousands of dollars, this is one of the best opportunities available right now.
Final Thoughts
The Waves Diamond Bundle has always been one of the most powerful plugin collections available for music producers. But the new $199 price at Sounds Space makes it more accessible than ever before.
With more than 80 professional plugins included, support for all major DAWs, and tools designed for mixing, mastering, and sound design, this bundle remains one of the best investments a producer can make in 2026.
If you’ve been thinking about upgrading your plugin collection, this might be the perfect time to do it. Deals like this do not appear often, and saving over $2800 on a professional plugin bundle is something that every music producer should seriously consider.
Kaizen DSP Releases Choroboros – Free Multi-Engine Chorus
Written by Sounds Space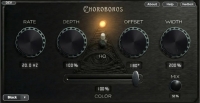
Kaizen DSP Releases Choroboros: A Powerful FREE Multi-Engine Chorus Plugin (Open Beta)
In the world of music production, chorus effects remain one of the most essential tools for adding width, depth, and movement to a sound. From lush vocal doubling to swirling synth textures, chorus plugins are a staple in almost every producer’s workflow. Now, the Canadian audio software developer Kaizen DSP has introduced a new entry into the modulation space: Choroboros, a free multi-engine chorus plugin currently available in open beta for macOS and Windows.
Unlike many traditional chorus plugins that offer just a single algorithm or basic controls, Choroboros stands out with a multi-engine architecture, allowing producers to switch between several modulation styles ranging from classic analog chorus to experimental spatial effects. The plugin is currently offered free during its public beta period, giving producers and sound designers the opportunity to explore its capabilities before the official commercial release planned after the beta phase.
In this article, we’ll explore what Choroboros is, what makes it unique, its key features, and why this free plugin is already attracting attention in the audio production community.
What Is Choroboros?
Choroboros is a multi-engine chorus effect plugin designed to provide producers with deep control over modulation and stereo movement. Developed by Kaizen DSP, the plugin combines five different chorus engines and ten DSP algorithms inside a streamlined interface.
The goal of the plugin is simple: instead of forcing producers to use multiple chorus plugins to achieve different styles, Choroboros provides multiple sonic “colors” within one tool. Each engine is designed with a specific tonal character and processing approach, allowing users to quickly move from subtle stereo widening to rich analog modulation or experimental spatial effects.
The plugin is available in VST3 and AU formats for Windows and macOS, with support for modern sample rates up to 192 kHz and zero reported latency, making it suitable for both studio production and real-time processing.
Why Chorus Plugins Still Matter
Before diving deeper into Choroboros, it’s worth understanding why chorus effects remain so widely used in music production.
A chorus effect works by duplicating a signal and slightly modulating its pitch and timing, creating the illusion of multiple instruments or voices playing together. This technique adds movement and thickness to sounds without drastically altering their core tone.
Common uses include:
-
Thickening lead vocals
-
Adding width to synth pads
-
Creating movement in guitars
-
Enhancing bass textures
-
Designing atmospheric ambient soundscapes
Because of this versatility, modern producers often rely on chorus effects to give their tracks more life and dimension.
Choroboros builds on this tradition but takes the concept further by offering multiple chorus models in a single plugin.
The Five Chorus Engines
The defining feature of Choroboros is its five unique chorus engines, each designed with a different modulation style and sonic character.
Each engine also offers Normal and HQ modes, giving users a total of ten DSP algorithms to explore.
Let’s break them down.
1. Green Engine – Classic Chorus
The Green engine focuses on a traditional, musical chorus sound inspired by classic digital modulation effects.
It uses Lagrange interpolation algorithms that prioritize smooth pitch modulation while maintaining low CPU usage. The Normal mode uses a third-order interpolation, while the HQ mode increases fidelity with a fifth-order interpolation for more accurate harmonic behavior.
This engine is perfect for:
-
Guitar chorus
-
Vintage synth textures
-
Subtle vocal widening
-
Classic 80s-style modulation
The Green engine offers a familiar chorus sound that fits easily into most mixes.
2. Blue Engine – Modern Transparent Modulation
The Blue engine focuses on clean, modern chorus effects with precise stereo imaging.
Instead of emphasizing color or analog warmth, this engine uses cubic interpolation and Thiran allpass filters to maintain transparency and phase accuracy.
This makes it ideal for:
-
Modern electronic music
-
Clean vocal widening
-
Ambient sound design
-
Subtle stereo enhancement
If you want a chorus effect that enhances width without sounding “effected,” the Blue engine is a great choice.
3. Red Engine – Vintage Analog Emulation
The Red engine is designed for producers who love the warmth and character of classic analog gear.
In Normal mode, it uses a bucket-brigade device (BBD) filtering, which emulates the circuitry used in many vintage chorus pedals. In HQ mode, it switches to a tape-style algorithm that simulates wow, flutter, and tape saturation.
This engine excels at:
-
Vintage synth sounds
-
Retro chorus guitar tones
-
Lo-fi textures
-
Tape-style modulation effects
For producers working in genres like synthwave, house, or indie electronic, the Red engine offers plenty of analog-inspired character.
4. Purple Engine – Experimental Spatial Effects
The Purple engine is where Choroboros starts to get experimental.
Instead of traditional chorus modulation, this engine uses phase-warped processing and 2D orbital modulation, moving the signal across a virtual spatial plane rather than a simple modulation path.
The result can produce unusual stereo motion and evolving textures.
Sound designers may find this engine particularly useful for:
-
Experimental electronic music
-
Cinematic sound design
-
Ambient pads
-
Complex spatial modulation
This is one of the more unique aspects of Choroboros compared to typical chorus plugins.
5. Black Engine – Efficient Ensemble Processing
The Black engine is designed for efficient, low-CPU chorus processing.
Its Normal mode uses linear interpolation, creating a transparent modulation effect without adding significant coloration. In HQ mode, it expands into a multi-voice ensemble algorithm, which simulates multiple voices layered together.
This engine is perfect for:
-
Thick synth layers
-
Bass chorus
-
Wide pad stacks
-
Efficient CPU usage in large projects
Simple Yet Powerful Controls
Despite its complex internal algorithms, Choroboros uses a minimal control layout, making it easy to use.
The plugin features six main parameters:
-
Rate – Controls modulation speed
-
Depth – Determines the intensity of pitch modulation
-
Offset – Adjusts LFO phase relationship
-
Width – Controls stereo spread
-
Color – Alters tonal character depending on the engine
-
Mix – Balances dry and wet signals
These controls allow producers to shape the chorus effect quickly without navigating complicated menus.
Tempo Sync and Workflow Enhancements
Choroboros includes several workflow-friendly features designed to make the plugin easier to use during production.
One of the most useful features is tempo synchronization. Users can right-click the Rate control to sync the modulation speed to their DAW’s BPM, with options for straight, triplet, dotted, and swing timing divisions.
Other workflow features include:
-
Engine memory – Each engine remembers its own settings
-
Direct value input – Double-click parameters to enter exact values
-
Per-engine visual skins – Unique interface design for each engine
-
Integrated feedback system – Send usage feedback directly from the plugin
These features make switching between modulation styles fast and intuitive.
A Unique Built-In Developer Panel
One feature that makes Choroboros stand out from many other plugins is its built-in developer panel.
This panel exposes the plugin’s internal DSP behavior in real time, allowing users to see how the algorithms are processing the audio signal.
The developer panel includes tools such as:
-
Real-time signal flow visualization
-
Audio thread timing diagnostics
-
Frequency response analysis
-
Engine-specific tone curves
-
Parameter mapping tools
For producers and audio developers interested in the technical side of DSP, this panel offers a rare level of transparency.
Open Beta and Future Plans
Currently, Choroboros is available as a free open beta, with the source code released under the GPLv3 license. This means developers and enthusiasts can explore the plugin’s internal algorithms during the beta period.
However, Kaizen DSP has stated that the final version (v1.0) will eventually become a commercial closed-source plugin, while the beta codebase will remain publicly available.
The beta phase is expected to continue until May 1, 2026, giving producers plenty of time to experiment with the plugin and provide feedback to the developers.
System Compatibility
Choroboros supports modern production environments with the following specifications:
-
Formats: VST3 and AU
-
Platforms: Windows and macOS
-
Sample rates: 44.1 kHz to 192 kHz
-
Bit depth: 32-bit floating point
-
Latency: 0 samples reported
A Pro Tools AAX version is currently under development, which will expand compatibility further once released.
Why Choroboros Is Worth Trying
For a free plugin, Choroboros offers a surprisingly deep feature set.
Here are a few reasons producers may want to add it to their toolkit:
1. Multiple chorus styles in one plugin
Instead of using several chorus plugins, you get five different modulation engines in one tool.
2. High-quality DSP algorithms
The plugin offers ten algorithms designed for both classic and modern chorus effects.
3. Advanced developer diagnostics
The integrated dev panel provides insight into how the plugin processes audio.
4. Modern workflow features
Tempo sync, parameter memory, and direct value entry improve usability.
5. Completely free during beta
Producers can download and use the plugin at no cost during the beta period.
Final Thoughts
The release of Choroboros by Kaizen DSP highlights how innovative free plugins can still be in today’s audio production landscape. With its multi-engine architecture, experimental modulation options, and transparent DSP design, Choroboros offers far more flexibility than many traditional chorus effects.
While the plugin is still in open beta, it already demonstrates strong potential as a powerful modulation tool for producers, sound designers, and mixing engineers.
If you’re looking for a versatile chorus plugin that goes beyond simple stereo widening, Choroboros is definitely worth exploring. Its combination of classic analog tones, modern digital precision, and experimental spatial effects makes it one of the more interesting new releases in the world of audio plugins.
And since the beta version is currently free, there’s no better time to give it a try.
20 Best Free VST Plugins in 2026 – Top Synths, Effects & Mixing Tools for Music Producers
Written by Sounds Space
🎶 20 Best Free VST Plugins for Music Production in 2026
Ultimate list of free synths, effects, mixing tools & instruments you can download today
In 2026 the quality of free VST plugins continues to explode. Whether you’re a beginner making your first beats, an indie producer on a budget, or a seasoned pro looking for fresh sound tools, the newest wave of VST instruments and effects has something for everyone. Best of all — these powerful plugins cost $0 and often rival paid alternatives.
In this guide we’ll break down the top 20 free plugins you should download now, grouped by category so you can build a complete production setup without spending a dime.
🎹 Free Virtual Instruments (VSTi)
1. Vital (Free Version)
One of the most celebrated free wavetable synths. Vital’s interface and sound quality rival premium tools, with deep modulation and stunning visuals. Perfect for EDM, cinematic, and experimental patches.
2. Surge XT
This open-source hybrid instrument packs subtractive, FM and wavetable synthesis all in one. Surge XT is an incredibly flexible synth with thousands of presets for any genre.
3. Spitfire Audio LABS
More than a plugin — a constantly updated suite of gorgeous sampled instruments: pianos, strings, drums, ambient textures, and more. A must-have for emotional scoring and organic sounds.
4. Dexed
If you love classic ’80s FM tones, Dexed emulates the Yamaha DX7 and even loads original patches. Great for electric pianos, metallic leads, and unique textures.
5. Grand Piano by Audiolatry
A detailed, expressive acoustic piano plugin that gives a realistic piano tone without cost — ideal for ballads, pop, jazz, or scoring.
6. MOK Miniraze
A character-full, minimal digital synth built for gritty leads, crunchy bass, and lo-fi textures. Its limited control set encourages creativity without complexity.
7. Full Bucket Music FB-02
Inspired by classic FM hardware, FB-02 delivers retro digital tones perfect for glassy keys and digital bass timbres.
8. Crow Hill Company Vaults / Free Instruments
This bundle includes unique, expressive sampled instruments spanning acoustic and electronic textures — excellent for creative inspiration.
🎛️ Creative Effects & Sound Design Tools
9. ValhallaDSP Supermassive (v5)
A stunning modulation, delay, and reverb tool that creates massive atmospheric soundscapes — perfect for pads, vocals, and FX. Eminently musically usable yet lush and ambient.
10. HoRNet TapeLite
A free tape saturation plugin that brings analog warmth, subtle compression, and harmonic thickness to your mix without the hassle.
11. Cymatics Deja Vu
A creative FX plugin for lo-fi pitch warping, tape-style artifacts, and nostalgic textures — perfect for beats, breakdowns, and character layers.
12. Tape Fiasco
A fresh, experimental multi-effects plugin with granular stretching, stutter modules, and tape-style varispeed — perfect for glitch and ambient sound design.
13. Lese Codec v2.0
Adds digital degradation, bitrate reduction, and ‘codec’ artifacts for creative grit on drums, vocals, and synths — a go-to for hyperpop and experimental tracks.
🎚️ Mixing, Mastering & Utility Tools
14. TDR Nova
A dynamic EQ that also functions as a de-esser and resonance tamer — essential for mixing and cleaning up problematic frequencies.
15. Komplete Start (Native Instruments)
A huge free bundle that includes sampled instruments, synths, Reaktor tools, and the Supercharger compressor AND Kontakt Player. Perfect for building a production backbone.
16. Analog Obsession MythPre
A simple analog-style preamp simulator that adds subtle harmonic weight — particularly useful on drums, bass, or anything that feels thin.
17. Xfer OTT
This wildly popular multiband compression effect is free and instantly enhances presence, impact, and loudness — essential on synths and buses.
🎙️ Vintage & Character Processors
18. Universal Audio 610 Tube Preamp & EQ Collection
Now available as a free native download, this classic tube preamp and EQ emulation adds richness and warmth to vocals, guitars, and mixes.
19. Arturia Analog Lab Free
A curated synth and keyboard preset collection that brings iconic tones from classic analog gear into your DAW for free.
20. FFOSSO Free Sound Library
A library of sampled instruments and textures perfect for layering, cinematic cues, or experimental music production.
📌 Why These Free Plugins Matter in 2026
Even as the music industry evolves and paid tools keep innovating, free VST plugins have never been stronger. Many of the tools listed here:
🎛️ Rival or surpass paid alternatives in sound quality and flexibility.
🎹 Are used in professional productions across genres from hip-hop to film scoring.
🔊 Offer creative options that are unique or niche — like glitch FX, tape saturation, and gritty digital artifacts.
⚙️ Require no investment, making them perfect for producers at any level.
Whether you’re building a home studio, scoring short films, or crafting your next EP, the plugins above will expand your sonic palette without costing a dime.
📥 How to Install These Free VST Plugins
Getting started with free plugins is easy — here’s a quick setup guide:
-
Download the plugin from the official site (always avoid third-party sites that bundle malware).
-
Install for your DAW (FL Studio, Ableton Live, Logic Pro via AU/VST3, Cubase, Reaper, etc.).
-
Scan your plugin folders in your DAW so the new VSTs show up.
-
Organize into categories (synths, effects, mixing) so you can recall them quickly.
-
Build presets or tweak existing ones — many free plugins come with excellent starter sounds.
📌 Pro Tips to Maximize These Tools
💡 Layer instruments — combine Spitfire LABS atmospheres with Vital or Surge XT for rich textures.
💡 Use creative effects early — put Tape Fiasco or Deja Vu on drums or vocals for instant character.
💡 Mix with purpose — tools like TDR Nova and Xfer OTT help polish your mix without expensive bundles.
💡 Explore presets — many free plugins come with community-made banks that unlock hidden potential.
🏁 Final Thoughts
The world of free VST plugins in 2026 is more vibrant and powerful than ever. From cutting-edge synths to world-class effects and mixing tools, producers now have access to a professional-grade toolkit without spending a cent.
Whether you’re just starting out or are a seasoned pro, this curated list of 20 free plugins will help you boost creativity, sharpen your mixes, and take your music to the next level.
Want a downloadable checklist of all these plugins with links? Just let me know! 🎧🔥
Best VST Plugins Without Subscription Plans (Perpetual Licenses Explained)
Written by Sounds Space
The Best VST Plugins Without Subscription Plans (Why Perpetual Licenses Still Matter)
The music production world has changed dramatically over the last decade. While innovation has exploded, one trend has frustrated producers more than any other: subscription-based VST plugins.
Monthly fees, locked sessions, disappearing tools, and endless renewals have pushed many producers to search for a better way. That’s where perpetual license VST plugins come in.
In this guide, we’ll explore the best VST plugins that do NOT require a subscription, explain why perpetual licenses are more important than ever, and help you build a future-proof plugin collection that you truly own.
Whether you’re a bedroom producer or a professional engineer, this list is for creators who want freedom, stability, and long-term value.
Why Subscription-Free VST Plugins Matter More Than Ever
Subscription models promise convenience, but they come with serious downsides that many producers only realize too late.
You Don’t Truly Own Your Tools
With subscriptions, the moment you stop paying:
-
Your plugins stop working
-
Old projects may not open correctly
-
Your creative workflow is interrupted
A perpetual license means once you buy it, it’s yours — forever.
Long-Term Cost Is Much Higher
A $15/month subscription might seem cheap, but over 5 years, that’s $900+ for something you’ll never own.
Perpetual plugins usually pay for themselves within a year.
Creative Freedom Without Pressure
Music should be about creativity, not worrying about:
-
Renewals
-
Price increases
-
Company shutdowns
Subscription-free plugins give you peace of mind.
What Is a Perpetual License VST Plugin?
A perpetual license means:
-
One-time payment
-
Unlimited usage
-
No monthly or yearly fees
-
Offline use supported
-
Your projects remain safe forever
Updates may be optional or paid, but the plugin never stops working.
This is especially important for producers who:
-
Revisit old sessions
-
Archive projects
-
Work professionally with clients
-
Want reliable tools for years
Best VST Plugins Without Subscription Plans (Perpetual License Only)
Below are industry-trusted VST plugins that offer one-time purchases and no subscription lock-ins.
FabFilter – Industry Standard, Fully Perpetual
FabFilter is one of the most respected plugin developers in the world.
Why FabFilter Stands Out
-
Clean, modern interfaces
-
Extremely high audio quality
-
No subscriptions
-
Generous upgrade pricing
Must-Have FabFilter Plugins
-
FabFilter Pro-Q 3 – Industry-leading EQ
-
Pro-L 2 – Transparent mastering limiter
-
Pro-C 2 – Versatile compressor
-
Pro-MB – Multiband dynamics powerhouse
FabFilter plugins are used by top mixing and mastering engineers worldwide — and once you buy them, they’re yours.
Valhalla DSP – Legendary Reverbs, No BS
Valhalla DSP is proof that great plugins don’t need subscriptions or aggressive marketing.
Why Producers Love Valhalla
-
Affordable pricing
-
Incredible sound quality
-
Simple, timeless interfaces
-
Lifetime ownership
Essential Valhalla Plugins
-
Valhalla VintageVerb
-
Valhalla Room
-
Valhalla Delay
-
Valhalla Plate
At around $50 per plugin, Valhalla offers some of the best value in the entire VST market.
Soundtoys – Creative FX You Actually Own
Soundtoys plugins are legendary for creative sound design, vocals, and effects.
What Makes Soundtoys Special
-
Unique character
-
Used by top artists and engineers
-
Perpetual licenses
-
Frequently discounted bundles
Standout Soundtoys Plugins
-
Decapitator – Saturation classic
-
EchoBoy – One of the best delays ever made
-
Little AlterBoy – Vocal manipulation favorite
-
Crystallizer – Granular pitch shifting
You buy it once, and it keeps inspiring forever.
u-he – Analog Modeling Perfection
u-he is a favorite among synth purists and sound designers.
Why u-he Is Loved
-
Deep analog emulation
-
No subscriptions
-
DRM-friendly
-
Massive community support
Top u-he Plugins
-
Diva – Analog synth powerhouse
-
Hive – Modern EDM and pop synth
-
Zebra 2 – Legendary modular synth
-
Presswerk – Analog-style compressor
u-he plugins are known for lasting 10+ years in professional setups.
ToneBoosters – High Quality, Low Cost, No Subscriptions
ToneBoosters is massively underrated.
Why ToneBoosters Is a Hidden Gem
-
Extremely affordable
-
Clean sound
-
Lightweight CPU usage
-
One-time purchase
Popular ToneBoosters Plugins
-
TB Equalizer
-
TB Compressor
-
TB ReelBus (tape emulation)
-
TB Morphit (headphone correction)
Perfect for producers who want quality without spending a fortune.
Voxengo – Precision Tools for Mixing & Mastering
Voxengo plugins are trusted by engineers who value accuracy.
Voxengo Strengths
-
Transparent processing
-
Technical precision
-
Perpetual licensing
-
Excellent metering tools
Must-Have Voxengo Plugins
-
SPAN – Industry-standard spectrum analyzer (free)
-
Elephant – Mastering limiter
-
GlissEQ – Dynamic EQ
-
Marquis Compressor
Voxengo proves subscriptions aren’t needed for professional results.
Why Perpetual License Plugins Are Essential for Long-Term Producers
Let’s be real — trends change, companies change, pricing changes.
But your projects shouldn’t break because a billing cycle ended.
Perpetual Licenses Protect Your Work
-
Old sessions always open
-
No forced upgrades
-
No cloud dependency
-
No sudden access loss
This is critical for:
-
Film composers
-
Mixing engineers
-
Labels
-
Long-term artists
Subscriptions Can Kill Creativity
Knowing your tools can disappear creates stress.
Perpetual plugins:
-
Encourage exploration
-
Reward long-term mastery
-
Build consistent workflows
That’s why many professionals are actively moving away from subscriptions.
How to Build a Subscription-Free Plugin Arsenal
You don’t need hundreds of plugins.
Smart Perpetual Setup Example
-
FabFilter Pro-Q 3 (EQ)
-
Valhalla VintageVerb (Reverb)
-
Soundtoys Decapitator (Saturation)
-
u-he Diva (Synth)
-
Voxengo SPAN (Metering)
This setup can last a decade or more.
Buy slowly, learn deeply, and avoid subscription traps.
Final Thoughts: Own Your Tools, Own Your Sound
Subscription models come and go — great music lasts forever.
Choosing VST plugins with perpetual licenses isn’t just about money. It’s about:
-
Creative independence
-
Stability
-
Respect for your work
-
Future-proofing your sound
If you care about your craft, your time, and your projects, owning your tools is non-negotiable.
Perpetual licenses aren’t outdated — they’re essential.
Best FREE VST Plugins in January 2026 (Top Synths, Effects & Mixing Tools)
Written by Sounds Space
The Best FREE VST Plugins in January 2026
Ultimate Guide for Music Producers, Beatmakers & Sound Designers
Whether you’re a beginner just starting with a DAW or a seasoned producer on a budget, free VST plugins are essential tools that can dramatically elevate your music production without costing a dime — and in January 2026, the free plugin ecosystem is more powerful and varied than ever. From virtual instruments to mixing and mastering tools, this guide covers the best free VSTs available now, how to use them, and why they matter.
💥 What Are VST Plugins — And Why Free Ones Matter
VST (Virtual Studio Technology) plugins are software extensions that add instruments or effects to your DAW (Digital Audio Workstation). They can emulate synthesizers, compressors, EQs, reverbs, tape machines — essentially everything a modern studio needs.
But premium plugins often cost $100–$500 each — a barrier for beginners and budget producers.
That’s where free VST plugins step in: they offer high-quality sound and professional features without the price tag — perfect for crafting beats, scoring, mixing, and experimentation.
In January 2026, dozens of powerful free tools are actively maintained and ready for use in any genre — from lo-fi hip-hop to cinematic ambient, trap to techno.
🌟 Top Free Synth & Instrument VST Plugins (Unlimited Creativity)
🎹 1. Vital — Premium-Quality Wavetable Synth
Vital is widely regarded as the best free wavetable synthesizer in the world — often compared to paid synths (like Serum). It gives producers rich oscillators, advanced modulation, onboard effects, and 150+ presets for every genre.
-
🔹 Genre versatility: EDM, synthwave, pop, ambient, cinematic
-
🔹 Why it’s great: Visual modulation, wavetable editing, powerful effects and a huge free preset library
-
🔹 Perfect for: leads, pads, basses, evolving textures
👉 A must-have free synth that rivals premium VSTs.
🥁 2. Spitfire Audio LABS — Real Instruments & Textures
Spitfire LABS isn’t one plugin — it’s a growing suite of free virtual instruments created by professional sample designers.
-
🎻 Real-world instruments: strings, pianos, pads, atmospheres
-
🎲 Constant new releases every month
-
💡 Great for scoring, ambient music, emotional hooks
No advanced synthesis skills needed — just load sounds and play.
🎛️ 3. Surge XT — Open-Source Powerhouse Synth
Surge XT continues to be a top free virtual instrument, offering:
-
Multiple synthesis types (subtractive, FM, wavetable)
-
Thousands of presets
-
Deep modulation and sound design tools
Perfect for producers who want versatility and depth.
🕹️ 4. Dexed — FM Synth Toy with Classic Character
Dexed emulates the legendary Yamaha DX7:
-
Authentic FM sound quality
-
Compatible with classic DX7 patches
-
Great for 80s tones, bells, FM keys, and unique textures
If you love retro or experimental synth sounds, this is essential.
⚙️ Best Free VST Plugins for Mixing & Effects
Good sounds need good processing. These free VSTs help shape, color, widen, and polish your mixes like a pro — without spending money.
🎚️ 5. Valhalla Supermassive — Infinite Reverb & Delay
This plugin is legendary for creative ambient effects:
-
Huge reverbs
-
Experimental delays
-
Deep tails and modulation
Valhalla Supermassive truly sounds massive, and it remains completely free. This makes it perfect for atmospheric pads, vocal treatments, transition sweeps, and more creative FX.
🎛️ 6. TDR Nova — Dynamic EQ That Rivals Paid Plugins
TDR Nova is a must-have mixing tool:
-
Parametric dynamic EQ
-
De-essing, harshness control
-
Multiband shaping
Whether you’re correcting vocals or tonally balancing a mix, Nova is professional quality.
📊 7. iZotope Ozone Imager 2 — Professional Stereo Widening
Ozone Imager 2 provides:
-
Stereo width controls
-
Mid/Side adjustments
-
Visual feedback
A great tool for deepening your mixes and giving them a wider, more polished sound.
🔊 8. A1StereoControl — Widening + Mono Bass Management
Finally — a free stereo field controller that works exactly like expensive imaging plugins:
-
Widen pads or synths
-
Keep the low end focused and punchy
Perfect for club mixes and streaming delivery.
🌀 9. Pancake 2 — Creative Stereo Motion
This plugin is ideal for adding automation and stereo movement:
-
Tempo-sync panning shapes
-
Drawable LFO curves
-
Perfect for rhythmic motion on leads or pads
A creative tool rather than a corrective one, but extremely fun and useful.
🧰 Other Must-Have Free Utility Plugins
Here’s a quick list of powerful free tools you’ll use every session:
| Plugin | Use Case |
|---|---|
| ZL Equalizer 2 | Clean, modern EQ for tracks |
| Graillon (Free) | Pitch correction & vocal FX |
| FirComp | Transparent compression |
| Deelay | Creative delay + diffusion |
| SPAN | Spectrum analyzer for mix insights |
| CHOW Tape Model | Analog-style tape saturation |
These plugins might not have flashy ads, but they deliver professional results without cost.
📥 Bonus: Seasonal & Limited Free Plugins (January Only)
Each January you’ll often find time-limited giveaways from premium developers — and January 2026 has some great ones:
🔥 SynthMaster One — Free Until Jan 4, 2026
KV331 Audio is offering this full wavetable synth for free — normally a paid plugin — so download it early in January.
🌀 AmenBreak VST — Free Mono Edition
A powerful breakbeat slicer and performance tool — perfect for jungle, glitch, and experimental rhythms.
Tip: Always grab limited-time free offers early, as they usually expire within the month.
🏆 How to Build a Free Plugin Setup That Works
Instead of downloading every plugin under the sun, here’s a balanced free setup you can install right now:
🎧 Instruments
-
Vital
-
Surge XT
-
Spitfire LABS
-
Dexed
🎛️ Mixing Essentials
-
TDR Nova
-
iZotope Ozone Imager
-
Valhalla Supermassive
-
A1StereoControl
-
ZL Equalizer 2
🎨 Creative FX
-
Pancake 2
-
CHOW Tape Model
-
Deelay
-
Graillon (Free)
This collection covers the full production pipeline — from sound design and sequencing to mixing and creative sound shaping.
🤔 Quick Installation & Workflow Tips
✔️ Scan Your Plugins Regularly
After installing a new collection, make sure to rescan in your DAW so your host recognizes them.
✔️ Organize by Category
Create plugin folders like:
🎹 Synths | 🎛 EQ & Dynamics | 🎨 FX
This speeds up workflow and prevents clutter.
✔️ Experiment First, Mix Later
Use creative plugins like Supermassive and Pancake 2 on rough ideas. Only refine with EQ and compression once your parts are laid down.
✔️ Use Presets as Learning Tools
Many free plugins come with preset banks — use them to understand sound design before diving deeper.
📈 Why Free Plugins Still Dominate in 2026
You might think “free software can’t be professional,” but in 2026 that’s far from true. Free plugins:
-
Are developed by respected creators
-
Compete with paid tools
-
Are regularly updated
-
Add a unique character and sonic signature
-
Encourage experimentation without risk
And because many producers share presets, tutorials, and community resources, the learning curve is smoother than ever.
🧠 Final Thoughts
Free VST plugins aren’t about compromise — they’re about smart production. Whether you’re:
🎶 Starting your first beat
🎛 Upgrading your mixing chain
🎹 Designing cinematic soundscapes
🎧 Producing professional tracks on a budget
There’s never been a better time to explore what’s available.
From powerful synths like Vital to mixing gems like TDR Nova and creative FX like Valhalla Supermassive, the best free VST plugins in January 2026 can power entire productions without spending money.
So download them, experiment, and let your creativity run wild — the only limit is your imagination.
More...
Native Instruments Enters Preliminary Insolvency: What It Means for Music Producers and DJs
Written by Sounds Space
Native Instruments GmbH Is in Preliminary Insolvency — What This Means for the Music Tech World
January 27, 2026 — Berlin, Germany. In a major development for the global music production community, Native Instruments GmbH — one of the most influential companies in music software and hardware — has entered preliminary insolvency proceedings, signaling a dramatic turning point in the company’s 30-year history.
This news has sent shockwaves through the music industry, given Native Instruments’ deep impact on electronic music production, DJing, sound design, and studio workflows. In this comprehensive guide, we’ll explore what insolvency means, why it matters, and how it could shape the future of the brand and its beloved products.
Who Is Native Instruments? A Quick Overview
Native Instruments GmbH is a German company founded in 1996 in Berlin by Stephan Schmitt and Volker Hinz. Over nearly three decades, the company built an impressive portfolio of products that have become staples in studios and stages worldwide, including:
-
Kontakt — industry-leading software sampler
-
Maschine — groove production hardware and software
-
Traktor — DJ performance software
-
Reaktor — modular synthesis environment
-
Massive and Absynth — iconic soft synths
-
Komplete — comprehensive instrument and effect suite
The company’s tools have shaped countless tracks across genres — from electronic and hip-hop to film scoring and pop production.
In recent years, Native Instruments also became the parent entity to iZotope, Plugin Alliance, and Brainworx, bringing additional influence through tools like Ozone, RX, and a suite of boutique plugins under one umbrella.
Breaking: Preliminary Insolvency Declared
On January 26, 2026, official insolvency documents filed with the Berlin courts confirmed that Native Instruments GmbH has entered preliminary insolvency proceedings. A specialist insolvency administrator — Prof. Dr. Torsten Martini — has been appointed to oversee the process.
What Does “Preliminary Insolvency” Mean?
Under German insolvency law, preliminary insolvency (vorläufige Insolvenzverwaltung) is an early stage of legal restructuring. It does not necessarily mean immediate bankruptcy or liquidation — but it does mean:
-
The company’s management loses authority over major decisions.
-
An appointed administrator oversees financial operations.
-
Assets may be reassessed, restructured, or prepared for sale.
-
Creditor protections kick in as the process unfolds.
In practical terms, this phase seeks to stabilize the company, prevent creditors from seizing assets, and determine whether the business can be rescued, restructured, or if its parts need to be sold off.
Why This Matters: Industry Impact
Native Instruments isn’t just another tech firm — it’s a pillar of the music production ecosystem. Its products have been used by millions of musicians, producers, composers, and DJs. Here’s why this insolvency is significant:
1. Creators Worldwide Depend on NI Tools
Hundreds of thousands of users rely on Native Instruments products — from Kontakt libraries powering symphonic scores to Maschine beats heard in chart-topping tracks. A disruption in support, updates, or licensing could impact creative workflows globally.
2. Third-Party Developers Are Tied In
Platforms like Kontakt and Reaktor function as ecosystems for third-party developers who build and sell instruments and effects. Insolvency uncertainty puts these partners in a precarious position, potentially affecting plugin availability and developer support.
3. Hardware and Software Product Lines Could Be Affected
Products such as Maschine hardware, Komplete bundles, and DJ controllers like those in the Traktor line could face discontinuation, restructuring, or changes in distribution depending on how asset sales are handled.
4. Brand and Ownership Might Change
Since 2021, Francisco Partners — a US-based private equity firm — has held a majority stake in Native Instruments. Preliminary insolvency puts that ownership into question and could lead to acquisitions by new investors or corporate buyers.
How We Got Here: Possible Causes and Context
The insolvency of a company as large as Native Instruments doesn’t happen overnight. A combination of industry pressures, internal challenges, and external market forces likely contributed.
1. Industry Competition and Market Shifts
Music production software is more competitive than ever. Agile competitors like Arturia, Cherry Audio, and others have gained traction with affordable, innovative instruments that appeal to modern creators. This fierce competition may have eroded NI’s market share over time.
2. Strategic Missteps and Integration Challenges
In the past decade, Native Instruments went through significant changes, including:
-
A period under the Soundwide brand (combining NI, iZotope, Plugin Alliance, Brainworx).
-
Frequent reorganizations and changes in leadership.
-
Challenges gaining traction with subscription-based services, such as Sounds.com.
These moves may have shifted focus away from core strengths and strained internal resources.
3. Economic Factors and Financial Pressure
Like many tech firms, Native Instruments faced turbulent economic conditions following the global pandemic. Layoffs in 2020 and 2023 revealed earlier financial stress, and maintaining innovation and relevance in a rapidly evolving market became increasingly difficult.
What This Means for Users
Support and Product Updates
While insolvency doesn’t immediately shut down support, users may see slower updates, licensing issues, or halted development depending on how the restructuring proceeds.
Licensing and Activation
Products that rely on online authorization (i.e., Native Access, NKS) may face changes if backend servers or support systems are altered during the insolvency process.
Product Continuity
Even if the brand continues under new ownership, product roadmaps may shift, be scaled back, or be integrated into other companies’ ecosystems.
What This Means for Employees and Partners
For the teams behind Native Instruments and its sister brands like iZotope and Plugin Alliance, preliminary insolvency introduces uncertainty:
-
Job security is not guaranteed during restructuring.
-
Contracts, partnerships, and future projects may be renegotiated.
-
Third-party developers and partners must reassess long-term plans.
However, insolvency procedures in Germany are designed to preserve value where possible, so not all outcomes are bleak — including opportunities for new investment or reorganization that could save parts of the business.
Industry Reaction: A Stunned Community
News of the insolvency has set off intense discussion across the music producer community:
-
Many long-time NI users express shock and sadness, given years of creative investment in the ecosystem.
-
Some speculate that technical debt and lack of significant innovation compared with rivals contributed to NI’s struggles.
-
Others urge users to back up libraries, consider alternatives, or brace for wider industry shakeups.
Possible Scenarios Ahead
With preliminary insolvency underway, there are several paths the story could take:
1. Restructuring and Recovery
The company works with the insolvency administrator to restructure debts, streamline operations, and return to profitability.
2. Sale or Acquisition
Key assets — including flagship products or divisions — could be acquired by new owners who continue development under different leadership.
3. Brand Fragmentation
Parts of the business — perhaps the software division, hardware division, or product ecosystems — might be split and sold to different buyers.
4. Liquidation (Worst Case)
If rescue efforts fail, the company might be wound down and assets sold off, potentially ending official support for certain products.
Conclusion: A Defining Moment for Music Technology
Native Instruments’ preliminary insolvency is undeniably a major event for musicians, producers, and the wider music tech industry. For many, NI’s products have been tools of creativity for years — and the uncertainty ahead is emotionally and financially unsettling.
However, preliminary insolvency is not the end. It’s a legal process that can lead to restructuring, revitalization, and even new opportunities. The next weeks and months will be critical to understanding whether the company can be revived, restructured, or reborn under new ownership.
For now, users should stay informed, back up important projects and libraries, and monitor official updates as this story continues to unfold.
Pro-C 3: FabFilter Upgrades Its Hugely Popular Flagship Compressor Plugin – Here’s What’s New
Written by Sounds Space
Pro-C 3: FabFilter Upgrades Its Hugely Popular Flagship Compressor Plugin – Here’s What’s New
FabFilter has officially raised the bar once again with the release of Pro-C 3, the next evolution of its hugely popular flagship compressor plugin. Already regarded as one of the most transparent, flexible, and intuitive compressors in modern music production, Pro-C has long been a staple in professional studios, bedroom setups, and post-production environments alike.
With six brand-new compression styles, fully immersive audio support, and a serious dose of character and creative flexibility, Pro-C 3 is not just an incremental update — it’s a significant leap forward. Whether you’re mixing music, mastering tracks, or working in film, TV, or game audio, this new version is designed to meet the demands of today’s producers and engineers.
In this in-depth guide, we break down everything that’s new in FabFilter Pro-C 3, what’s improved, and why this update matters.
What Is FabFilter Pro-C 3?
FabFilter Pro-C 3 is a professional dynamic range compressor plugin designed for mixing, mastering, sound design, and immersive audio workflows. It builds on the legacy of Pro-C 2, which was already considered one of the most transparent and user-friendly compressors on the market.
Known for its clean sound, detailed visual feedback, and intelligent controls, Pro-C has always balanced precision and musicality. With Pro-C 3, FabFilter expands that vision further by introducing more sonic character, modern surround and immersive audio support, and deeper control over dynamics — all while maintaining the company’s signature sleek interface.
What’s New in Pro-C 3? A Big Step Forward
FabFilter hasn’t just refreshed the UI and added a couple of presets. Pro-C 3 introduces major new functionality that directly responds to how modern producers work today.
Key Highlights at a Glance
-
Six brand-new compression styles
-
Fully immersive audio support (Dolby Atmos & surround formats)
-
Enhanced character and saturation options
-
Improved attack and release behavior
-
Smarter visual feedback and metering
-
Workflow refinements for faster mixing
Let’s dive into each of these upgrades in detail.
Six New Compression Styles for Maximum Versatility
One of the most headline-grabbing upgrades in Pro-C 3 is the introduction of six new compression styles, dramatically expanding the plugin’s sonic palette.
While previous versions focused heavily on transparency and clean control, Pro-C 3 leans more confidently into characterful compression, giving producers more tonal options without needing additional plugins.
Why Compression Styles Matter
Different compression styles react uniquely to transients, sustain, and dynamics. By expanding the number of styles available, FabFilter allows users to tailor compression behavior precisely to the material — whether it’s drums, vocals, bass, synths, or full mixes.
These new styles range from:
-
Ultra-transparent and surgical
-
Punchy and aggressive
-
Warm, musical, and character-driven
This means Pro-C 3 can now comfortably cover tasks that once required multiple compressors — from clean leveling to creative tone shaping.
Fully Immersive Audio Support: Built for the Future
One of the most important technical upgrades in FabFilter Pro-C 3 is its full immersive audio functionality.
Native Support for Modern Formats
Pro-C 3 now supports:
-
Dolby Atmos
-
Surround formats up to 9.1.6
-
Complex multichannel workflows
This makes it an excellent choice for film scoring, post-production, game audio, and immersive music mixing, where consistency and precision across channels are critical.
Channel Linking & Precision Control
FabFilter has refined channel linking options, allowing you to:
-
Compress channels independently
-
Link dynamics across surround beds
-
Maintain spatial integrity in immersive mixes
For engineers working in immersive environments, this update alone makes Pro-C 3 a must-have.
More Character Without Sacrificing Clarity
FabFilter plugins are famous for their clean sound — but Pro-C 3 adds a tasteful dose of character without compromising transparency.
Enhanced Compression Behavior
Pro-C 3 introduces:
-
More musical attack and release curves
-
Improved transient handling
-
Smoother gain reduction at higher ratios
This results in compression that feels alive and responsive, especially on drums, vocals, and buses.
Subtle Saturation & Harmonic Color
While Pro-C 3 is not a saturation plugin, the new compression styles introduce natural harmonic density that adds body and presence — particularly useful when working on vocals or analog-inspired mixes.
Visual Feedback: Still the Best in the Game
FabFilter has always excelled in visual clarity, and Pro-C 3 continues that tradition with subtle but meaningful refinements.
Improved Gain Reduction Display
The gain reduction meter is now even clearer, helping you:
-
See exactly how compression affects transients
-
Identify over-compression quickly
-
Dial in settings faster with confidence
Intuitive Interface Enhancements
Everything remains exactly where experienced users expect it to be — but smoother, faster, and more refined. FabFilter has mastered the art of improving workflows without breaking muscle memory.
Advanced Sidechain & Detection Options
Pro-C 3 retains FabFilter’s powerful sidechain and detection features while refining their responsiveness.
Sidechain EQ & Filtering
You can still shape the detector signal using:
-
High-pass and low-pass filtering
-
External sidechain input
-
Frequency-focused compression
This makes Pro-C 3 ideal for:
-
Vocal clarity
-
Bass-kick separation
-
Dynamic resonance control
Perfect for Mixing, Mastering, and Beyond
One of the biggest strengths of FabFilter Pro-C 3 is its versatility.
For Mixing Engineers
-
Control vocals with precision
-
Add punch to drums
-
Glue buses together naturally
For Mastering Engineers
-
Transparent dynamic control
-
Minimal phase distortion
-
Precise stereo and multichannel handling
For Sound Designers & Post-Production
-
Shape dynamics creatively
-
Maintain clarity in complex sessions
-
Work seamlessly in surround and immersive formats
Few compressors can move so effortlessly between these roles.
Pro-C 3 vs Pro-C 2: Is the Upgrade Worth It?
If you’re currently using Pro-C 2, the question is obvious: should you upgrade?
Reasons to Upgrade to Pro-C 3
-
You want more character and tonal options
-
You work in surround or immersive audio
-
You need more modern compression behavior
-
You want future-proof compatibility
If you rely on Pro-C daily, Pro-C 3 feels less like an optional update and more like a natural next step.
Performance & Compatibility
FabFilter Pro-C 3 is optimized for modern systems and offers excellent performance even in large sessions.
Supported Formats
-
VST3
-
AU
-
AAX
Supported Platforms
-
macOS (Apple Silicon & Intel)
-
Windows
It integrates seamlessly with all major DAWs, including Ableton Live, Logic Pro, Pro Tools, Cubase, Studio One, FL Studio, and more.
Final Thoughts: A New Benchmark for Compression
FabFilter Pro-C 3 is not just an update — it’s a statement. By combining six new compression styles, immersive audio support, and refined sonic character, FabFilter has once again set a new benchmark for what a modern compressor plugin should be.
Whether you’re a producer, mix engineer, mastering engineer, or post-production professional, Pro-C 3 delivers:
-
Surgical precision
-
Musical flexibility
-
Future-ready workflows
In a crowded plugin market, Pro-C 3 stands out as a tool that balances technical excellence with creative freedom — and that’s exactly why FabFilter remains at the top of the game.
Massive X Player (Free Version): Download the Powerful Free Synth Plugin by Native Instruments
Written by Sounds Space
Massive X Player (Free Version): The Ultimate Free Synth Plugin for Music Producers
If you’re a music producer, beat maker, sound designer, or electronic musician looking for a powerful yet beginner-friendly synthesizer plugin — without spending a dime — Massive X Player (Free Version) is one of the most exciting releases in 2025. Native Instruments has taken its flagship soft synth Massive X and created a free, streamlined version that lets you dive into professional-quality sounds instantly — even if you’ve never designed a patch before.
In this comprehensive and SEO-optimized blog post, we’ll explore everything you need to know about Massive X Player — what it is, how it works, key features, use cases, compatibility, and why it’s a game-changer for producers. Let’s jump in!
What Is Massive X Player (Free Version)?
Massive X Player is a free version of Native Instruments’ flagship wavetable synthesizer Massive X, included in the Komplete Start suite — a free collection of music production tools, instruments, and effects.
Unlike the full Massive X, which offers deep modular routing, custom oscillators, and advanced modulation systems, Massive X Player focuses on instant playability and creative inspiration with a minimal learning curve. It gives you access to a curated library of presets and simplified performance controls right out of the box.
With Massive X Player, you don’t need to understand complex synthesis workflows — you just load it up, choose a sound, and get making music.
Why Massive X Player Is a Big Deal for Music Producers
Before Massive X Player, getting a high-quality synth meant expensive plugins, steep learning curves, or basic free soft synths with limited sound quality. Now, Massive X Player bridges that gap by offering:
-
High-quality sounds from a flagship synthesizer engine
-
Easy-to-use controls without deep menus
-
Creative sound design tools built in
-
Totally free as part of Komplete Start
This makes it ideal for producers who want instant inspiration, beat makers who need polished sounds quickly, and even professionals who want a lightweight tool for sketching ideas.
Key Features of Massive X Player
Massive X Player comes packed with features designed to enhance your workflow and creativity — all without overwhelming you:
🎹 1. Powerful Preset Library
Massive X Player includes 60 high-quality presets spanning genres and uses — from deep basses and thick leads to lush pads and atmospheric textures.
It also comes with the Bass Music Essentials Expansion, giving even more preset variety at no extra cost.
🎨 2. Morpher: Intuitive Sound Control
One of the standout features in Massive X Player is the Morpher — a large X/Y pad that lets you blend sound parameters in real time. Drag across the pad to transform textures, reshape tones, and move between sonic ideas expressively without deep editing menus.
This makes sound design almost playful rather than technical — perfect for live tweaking or quickly finding your next hook.
📊 3. Animator: Built-In Modulation
Massive X Player includes an Animator — a modulation engine that brings evolving motion and rhythm to your sounds without needing traditional LFOs or envelope setups.
Use it to create pulsing basslines, shifting pads, and evolving textures that breathe life into static presets — all with minimal effort.
🎲 4. Randomize: Inspiration Accelerator
Stuck on ideas? Massive X Player’s Randomize button generates new sound variations instantly. This is a powerful creativity booster: random tweaks often spark fresh ideas or lead you in completely new sonic directions.
🎛️ 5. User-Friendly Interface
Massive X Player’s streamlined UI is all about performance:
-
Preset browser for quick sound selection
-
Easy control mapping
-
Intuitive visual pad controls
Whether you’re a beginner or pro, it’s designed so you can play first, tweak later.
How to Get Massive X Player for Free
Getting started with Massive X Player is simple:
-
Download the free Komplete Start bundle from Native Instruments
-
Install Native Access (Native Instruments’ installation manager)
-
Sign in or create an NI account
-
Install Massive X Player from Komplete Start
-
Open your DAW of choice and load Massive X Player as a VST3/AU/AAX plugin
It’s available for both macOS and Windows, and works in most major digital audio workstations.
Compatibility & Formats
Massive X Player supports the most common plugin formats:
-
VST3 (Windows/macOS)
-
AU (macOS)
-
AAX (Pro Tools)
This ensures compatibility across DAWs such as FL Studio, Ableton Live, Logic Pro, Cubase, Studio One, Bitwig, Pro Tools, and more.
Use Cases: Who Is Massive X Player Best For?
Massive X Player isn’t just for one type of user — it’s flexible enough for a wide range of creators:
🧠 Beginners & New Producers
If you’re just getting into synthesis, Massive X Player offers a gentle introduction without forcing you to learn deep synthesis techniques. You can play inspiring presets and tweak meaningful controls instantly.
🎹 Beat Makers & Electronic Artists
Whether you make house, hip-hop, techno, trap, or ambient music, Massive X Player’s presets cover a wide sonic palette ready to be dropped into your track.
🎧 Professional Producers
Even seasoned producers spend time sketching ideas quickly. Massive X Player gives pros a lightweight tool to audition sounds fast, without loading a complex project or spending time on deep sound design.
🎼 Sound Designers
Want to experiment with evolving textures and movement? The Morpher and Animator tools inspire sound design creativity without the complexity of a fully modular synth.
Free vs Full Version: How They Compare
While Massive X Player is powerful and free, it differs from the full version of Massive X in a few key ways:
| Feature | Massive X Player | Full Massive X |
|---|---|---|
| Preset-Driven Workflow | ✔️ | ✔️ |
| 60 Presets Included | ✔️ | ✔️ + full factory library |
| Advanced Routing | ❌ | ✔️ |
| Custom Oscillators | ❌ | ✔️ |
| Deep Modulation Matrix | ❌ | ✔️ |
| Fully Editable Patch Design | ❌ | ✔️ |
In short, Massive X Player is perfect for inspiration, quick production, and playability — while the full Massive X remains the go-to choice for deep synthesis and sound design flexibility.
Tips for Making the Most of Massive X Player
To get the most out of Massive X Player, here are some practical tips:
🎧 Start With Presets You Love
Explore the included 60 presets first — they’re curated to show the breadth of what the Player version can do.
🎚️ Use the Morpher Creatively
Instead of static sounds, use the Morpher to transition between textures and find unique hybrid tones.
🪄 Animate for Movement
Don’t just set and forget — use the Animator to inject life and movement into long chords or basslines.
🎲 Randomize Don’t Fear It
The Randomize feature is a shortcut to creative spark — experiment with it when ideas stall.
Conclusion: Why Massive X Player Matters in 2025
Massive X Player (Free Version) is more than just a free plugin — it’s a powerful tool that gives both new and seasoned producers access to the iconic sound-design capabilities of Native Instruments’ flagship synth Massive X, all without cost or complexity.
Whether you’re sketching beat ideas, performing live, or designing unique textures, Massive X Player delivers inspirational sounds with creative controls like Morpher, Animator, and Randomize that push your workflow forward. And because it’s included in the Komplete Start bundle, you get it alongside a host of other free instruments and effects — truly a production starter kit for creators of all levels.
Ready to elevate your sound? Grab Massive X Player today and unlock your next big idea in music!
Fender Studio Pro Review: Legendary Fender Tone Meets Modern Studio Power
Written by Sounds Space
Fender Studio Pro: Where Legendary Tone Meets Modern Studio Power
When musicians talk about iconic sound, one name has echoed through studios, stages, and bedrooms for decades: Fender. From Jimi Hendrix and Eric Clapton to modern producers shaping today’s sonic landscape, Fender has always been at the heart of musical innovation.
Now, with the Fender Studio Pro, the legendary brand brings its heritage directly into the modern studio — designed for creators who demand clarity, versatility, and professional-grade performance without sacrificing that unmistakable Fender soul.
Whether you’re a guitarist, producer, beatmaker, or recording artist, the Fender Studio Pro isn’t just another piece of gear — it’s a creative companion built for today’s music ecosystem.
Let’s dive deep into why the Fender Studio Pro is becoming a must-have tool for modern musicians.
The Evolution of Fender: From Stage to Studio
Fender’s journey began with amplifiers and guitars that defined entire genres. But as music creation evolved, so did the needs of artists. Home studios, digital production, and hybrid workflows have become the new norm.
The Fender Studio Pro represents this evolution — a product designed not only for live performance but for studio accuracy, recording precision, and creative flexibility.
This is Fender acknowledging one simple truth:
Today’s musicians don’t just perform music — they produce it.
Built for the Modern Musician
One of the standout qualities of the Fender Studio Pro is its studio-first design philosophy. Every element is crafted to serve creators who care about how their music sounds in real-world playback environments — streaming platforms, headphones, cars, clubs, and live venues.
Key Creative Advantages:
-
🎧 Studio-grade sound clarity
-
🎸 Authentic Fender tonal character
-
🎚️ Designed for recording, monitoring, and production
-
🔊 Balanced output for mixing and tracking
-
🖥️ Seamless integration with modern DAWs and setups
Whether you’re recording guitars, producing electronic music, or mixing vocals, the Studio Pro delivers a transparent yet musical response that helps your tracks translate across platforms.
Legendary Fender Tone — Refined for the Studio
What truly sets the Fender Studio Pro apart is how it captures Fender’s iconic tonal DNA while refining it for studio precision.
Instead of coloring your sound excessively, it provides:
-
Clean, detailed frequency response
-
Tight low end without muddiness
-
Smooth, musical mids
-
Crisp highs without harshness
This makes it perfect for:
-
Guitar recording
-
Amp modeling and plugins
-
Vocal monitoring
-
Beat production
-
Final mix referencing
In short, it lets you hear your music honestly, while still enjoying the warmth Fender is famous for.
Perfect for Home Studios and Professional Setups
The rise of home studios has changed everything. Artists now demand professional sound in compact, efficient setups — and Fender Studio Pro delivers exactly that.
Why Home Producers Love It:
-
Compact and studio-friendly
-
No unnecessary complexity
-
Easy to integrate with existing gear
-
Reliable performance for long sessions
At the same time, it’s powerful enough for professional studios, making it a versatile choice for engineers working across genres and formats.
Designed for Long Creative Sessions
Creativity doesn’t run on a schedule. Late nights, long sessions, and endless revisions are part of the process — and Fender clearly understands this.
The Studio Pro is designed with:
-
Ergonomic comfort
-
Durable build quality
-
Consistent performance over time
This makes it ideal for producers and musicians who spend hours crafting sound, not just minutes testing ideas.
A Tool That Grows With Your Sound
One of the most underrated qualities of the Fender Studio Pro is its long-term value.
As your skills evolve:
-
Your ears become more trained
-
Your mixes become more detailed
-
Your productions become more refined
The Studio Pro scales with you — revealing more nuance and depth as your listening ability improves.
This makes it a smart investment, not just a short-term upgrade.
Why Fender Studio Pro Stands Out in a Crowded Market
Let’s be honest — the music gear market is saturated. But Fender doesn’t chase trends. It builds tools that last.
What Makes Fender Studio Pro Different:
-
Backed by decades of sound innovation
-
Built with musicians, not just engineers, in mind
-
Balances musicality with technical accuracy
-
Trusted brand heritage with modern execution
While many products aim to impress with specs alone, Fender focuses on what truly matters:
How it makes you create.
Ideal Genres for Fender Studio Pro
The versatility of the Fender Studio Pro makes it suitable across multiple genres:
🎸 Rock & Alternative – Authentic guitar tone and clarity
🎹 Electronic & Techno – Accurate monitoring and clean low-end
🎤 Hip-Hop & R&B – Vocal presence and balance
🎼 Pop & Indie – Polished sound with warmth
🎧 Lo-Fi & Experimental – Honest playback for creative textures
No matter your style, the Studio Pro adapts to your workflow.
Fender Studio Pro and the Future of Music Creation
Music production is becoming more personal, decentralized, and artist-driven. Tools like the Fender Studio Pro empower creators to take full control of their sound — without relying on massive studios or expensive setups.
This aligns perfectly with today’s creator economy:
-
Independent artists
-
Bedroom producers
-
Hybrid performers
-
Content creators and YouTubers
Fender isn’t just selling gear — it’s supporting a new generation of musicians.
Who Should Buy the Fender Studio Pro?
The Fender Studio Pro is perfect for:
✔️ Guitarists who record at home
✔️ Producers who want reliable studio sound
✔️ Artists upgrading from entry-level gear
✔️ Musicians who value tone over hype
✔️ Creators building a serious music workflow
If you care about how your music actually sounds, this is a no-brainer.
Final Thoughts: Is Fender Studio Pro Worth It?
Absolutely — and not because of hype, but because of heritage, design, and real-world performance.
The Fender Studio Pro represents:
-
The past: Fender’s legendary sound
-
The present: modern studio needs
-
The future: creator-focused music production
In a world where music is consumed faster than ever, tools that help you craft timeless sound are priceless.
If you’re serious about your music, your mixes, and your creative journey, the Fender Studio Pro deserves a place in your studio.